© Dale Staples
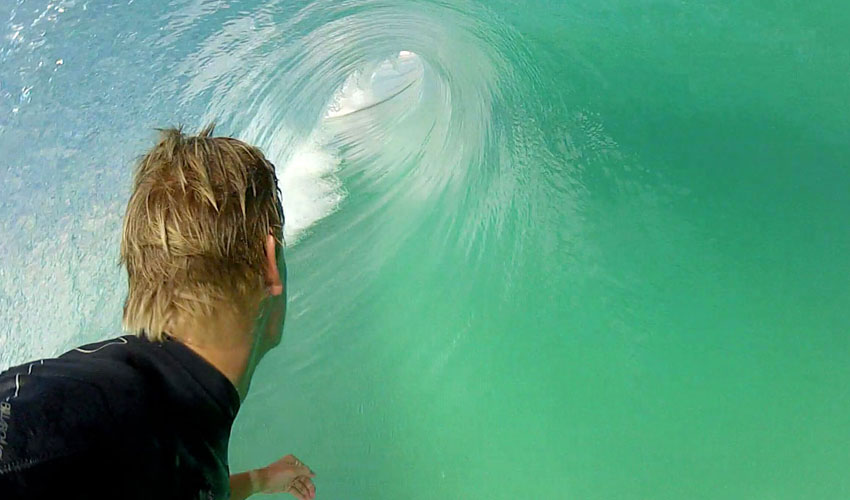
GoPro POV (Point of View) shots can get pretty boring after a while unless there's an interesting angle or a good barrel like the Duckster's above. Seeing as I don't get barreled, I have more fun getting shots of others peeps surfing, or random stuff like a kiff unset or the dolphins cruising by. The hiccup is that GoPro is designed primarily as a POV camera, and that means the majority of the mounts that are made for it have this in mind. So no probs to stick it to your board, or fasten it to your chest, head or wrist. All good as long as you're wanting shots of yourself, or straight in front/behind you it works like a bomb. Considerably less practical if you're wanting shots of other peeps or a different angle on the POV image. There're some great lil point and shoot grips such as the LangArm (what Dale Staples is using) which is an extender pole you attach your GoPro to, or the Bobber, which is a small pistol grip. Hiccup with both of these is that although you can get some great angles with them, you have to hold em in your hand or bite em in your teeth whilst paddling and getting up. Doesn't work so lekker if you have a small mouth or small hands! Your only other option is to leave it dangling from the wrist leash whilst you paddle, but that gets in the way most of the time and acts like an anchor. Scouring the internet proved fruitless, nothing out there that was what I was looking for. So along came the idea for the home-made Shoot, Clip & Go arm mount. All the perks of being able to have your GoPro on a stablising grip for better angles, but then being able to clip it away after shooting so you can have a hands-free paddle back. Lots of scribbling on bits of paper later and I arrived at the start of an idea. A bodyboard elbow leash that had a clip attached to it so you could clip/unclip a GoPro on a small pole into it. Bottom of the pole attached to the leash so your GoPro doesn't go swimming off by itself. Pretty stoked with how it turned out - even think it might work! Hasn't had a test run in the surf yet, so hopefully some swell this week. 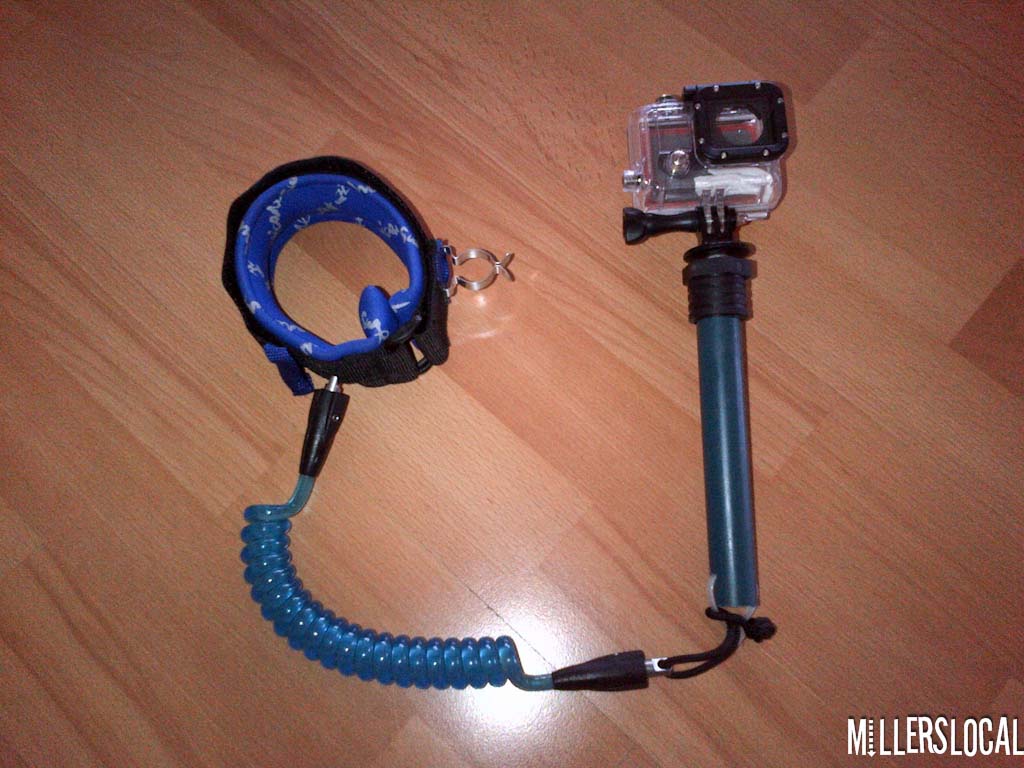
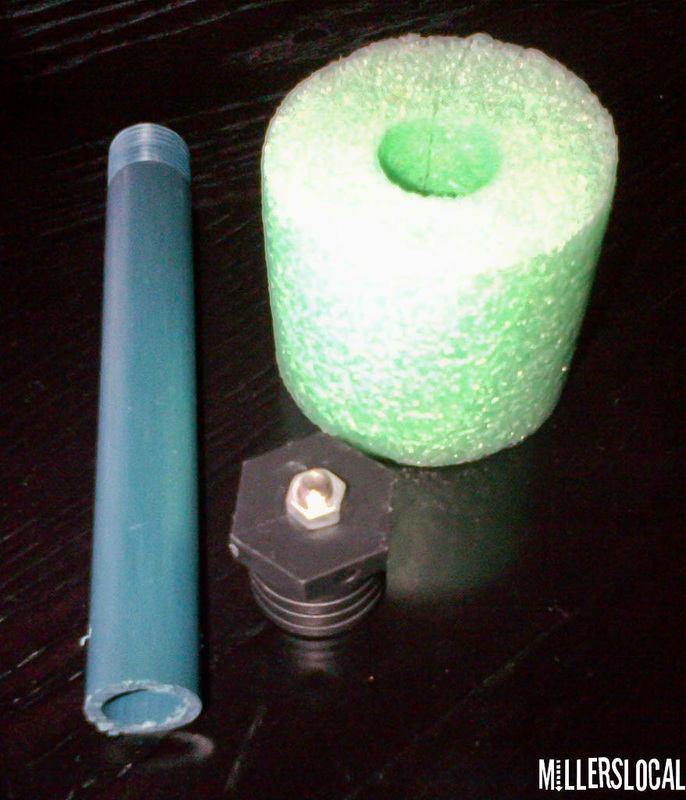
Everything you need besides the GoPro and GoPro tripod mount you can grab at your local surf shop and hardware store. Just one item at the surf shop - the bodyboard elbow leash. Here's the list for the hardware store: For the pole: small piece of irrigation tubing which you'll hacksaw down to the preferred length of your hand grip, stop cock to screw onto the thread of your irrigation tube. Short 1/4 inch bolt & 2 nuts which will be what your GoPro tripod mount screws on to (take your GoPro Tripod mount with to make sure you get the correct bolt size). Cable tie (to attach pole to leash), small bit of pool noodle to stick into pole for flotation. Drill. For the clip: small strip of webbing (stuff that looks like your seatbelt), superglue, pack of things called clip terry tools 19mm, pack of very short 3mm bolt n screws - need one to fix terry clip to velcro of leash, needle, fishing braid (stronger than cotton), pliers, blow torch, carpet knife or scissors. Make at your own risk. If you burn yourself, set the house alight or stab yourself with a needle it's your own fault. Apologies for the kak quality pics but a Blackberry sucks for photo's. 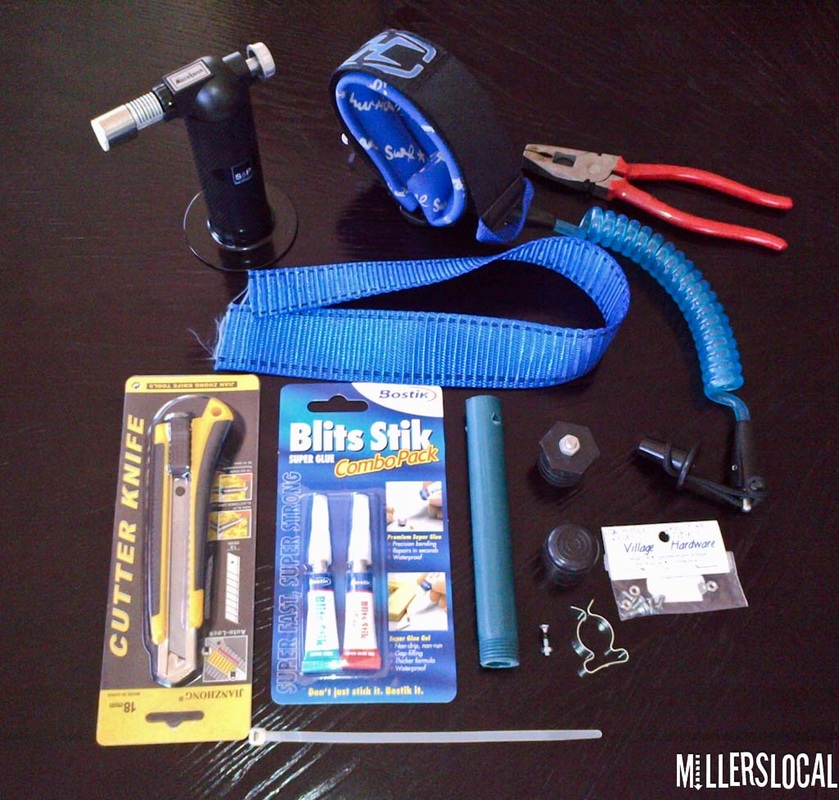
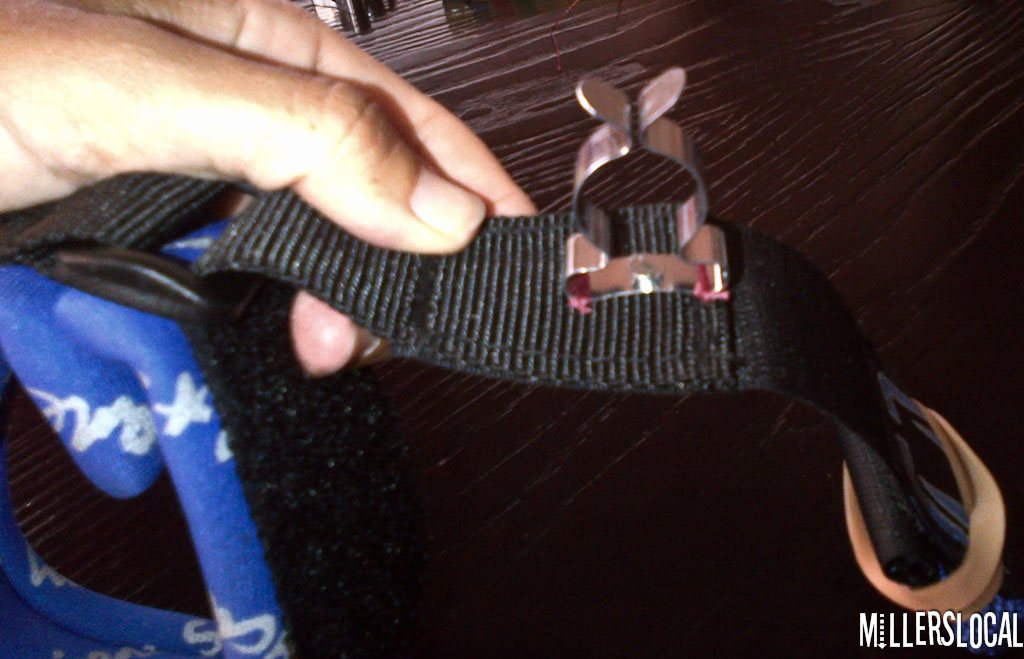
Put the elbow leash on your left arm, up as high as you can. Have it facing so the leash clip is pointing forwards and the velcro strap ends up fastening between your arm and body. Make a mark in the middle of the velcro strap where you want the clip to go - I put mine on the midpoint of the outside of my arm. This is where you're going to attach the clip. Double check when you take the leash off that this mark remains about 1cm away from the leash buckle - else you ain't gonna be able to get it on once the clip is attached cos it won't open wide enough! This isn't a problem if you've used a wrist leash. But just not sure if a wrist one will be wide enough to fit on the upper arm? Take the leash off your arm and have it in the opened position on a clear surface. Grab the short bolt with the pliers and blow torch it til red hot. Then push it through the velcro strap where you made the mark - the super-heated steel will just melt right through the velcro. So imagine what it will do to your flesh. Don't touch it! 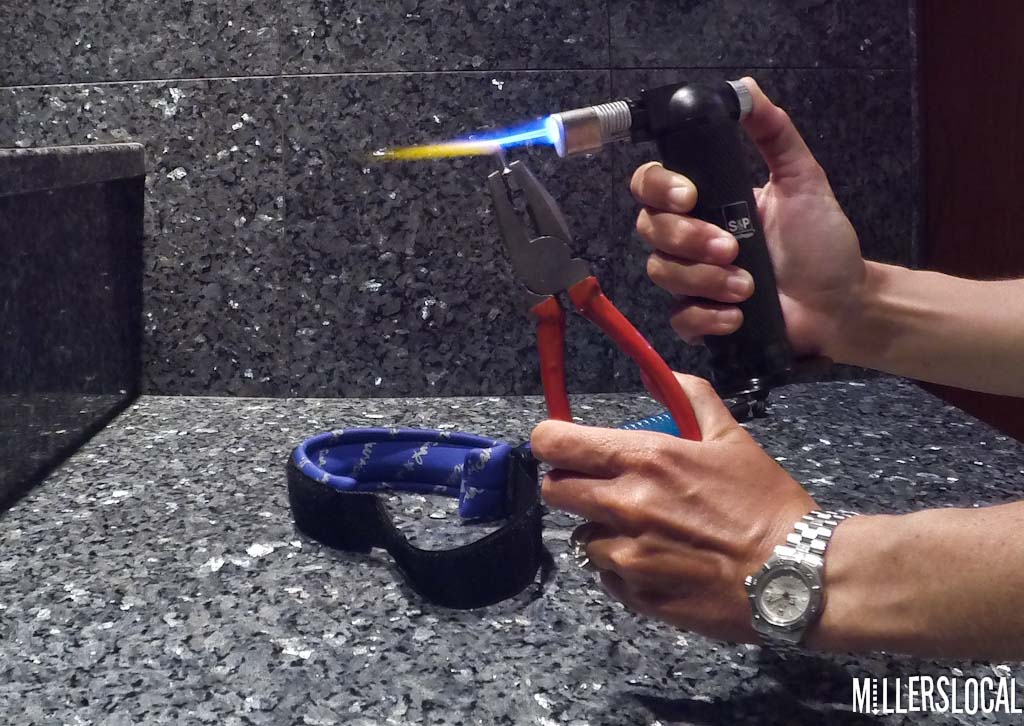
Put the hot bolt down somewhere safe. Take another bolt out the pack. Put it through the hole in the base of the terry clip, through the hole you just made in the velcro, and pop it's nut on at the bottom which just protrudes out the bottom of the velcro strap. Tighten hard with the pliers, so that the clip is parallel to the strap. 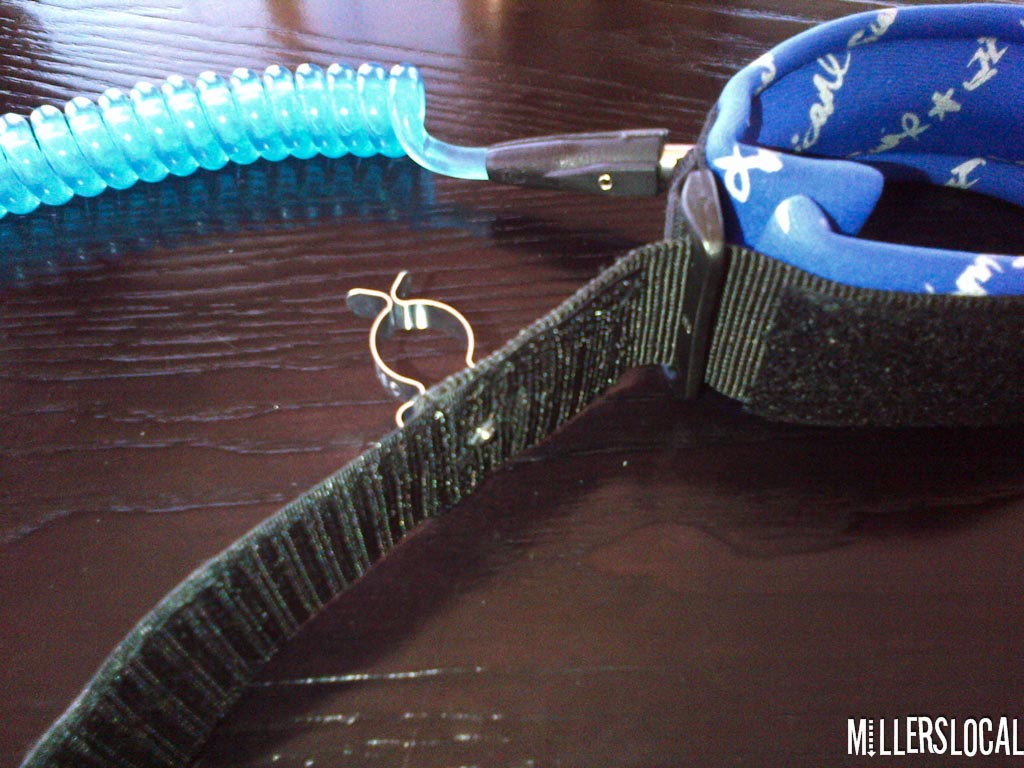
Grab the fishing line and needle. Sew over either end of the terry clip to secure it to the velcro so that it won't swivel on the single bolt attachment. Use a thimble if you're struggling to get the needle through the velcro, and pull it out the other side with pliers. It helps to roll up the end of the velcro strap and secure it with an elastic band - else it gets in the way whilst you sew.
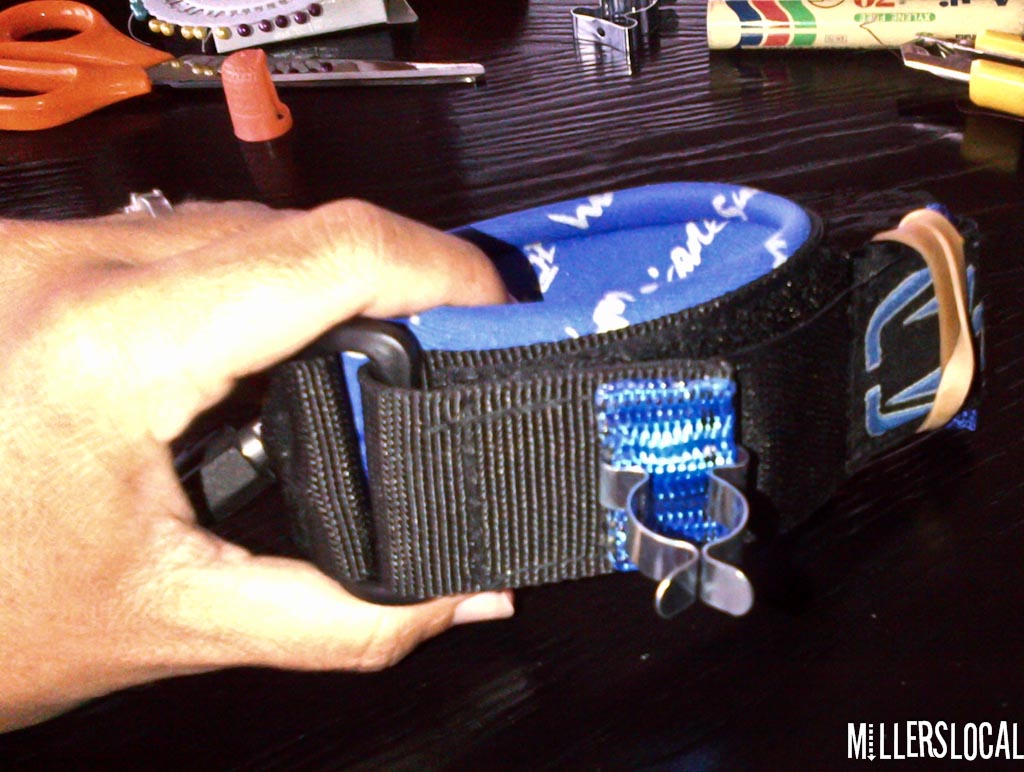
Just to keep the clip on vas, I also then glued a piece of webbing over it. You could stitch it on to for an even stronger bond. You could probably put a few drops of super glue on the nut on the other side to keep that from undoing itself. Good idea to burn the edges of the webbing with the blowtorch or a lighter before you stick it on - this just makes sure the edges don't unravel.
Cut the irrigation pole to whatever length you want your handgrip to be - just big enough for you to be able to grip it and yank it out the clip should work. Mine's about 15cm. Drill a hole through the top of the stopcock and put the 1/4 inch bolt through from inside the stopcock so it protrudes out the top. Pop the nut on and secure tightly, so you just have enough of the screw protruding out the top that you GoPro tripod mount will screw firmly onto it. The stopcock then screws onto the threaded part of the irrigation pole. Cut a bit of pool noodle into strips and shove em up the pole using the back end of a fork or whatever. This gives the pole some flotation. Drill a hole through either side of the irrigation pole near the bottom, and attach a cable tie through it - this is what the leash will secure to. 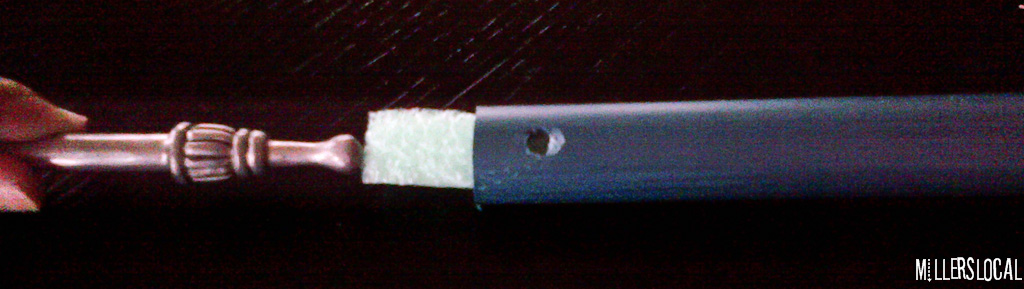
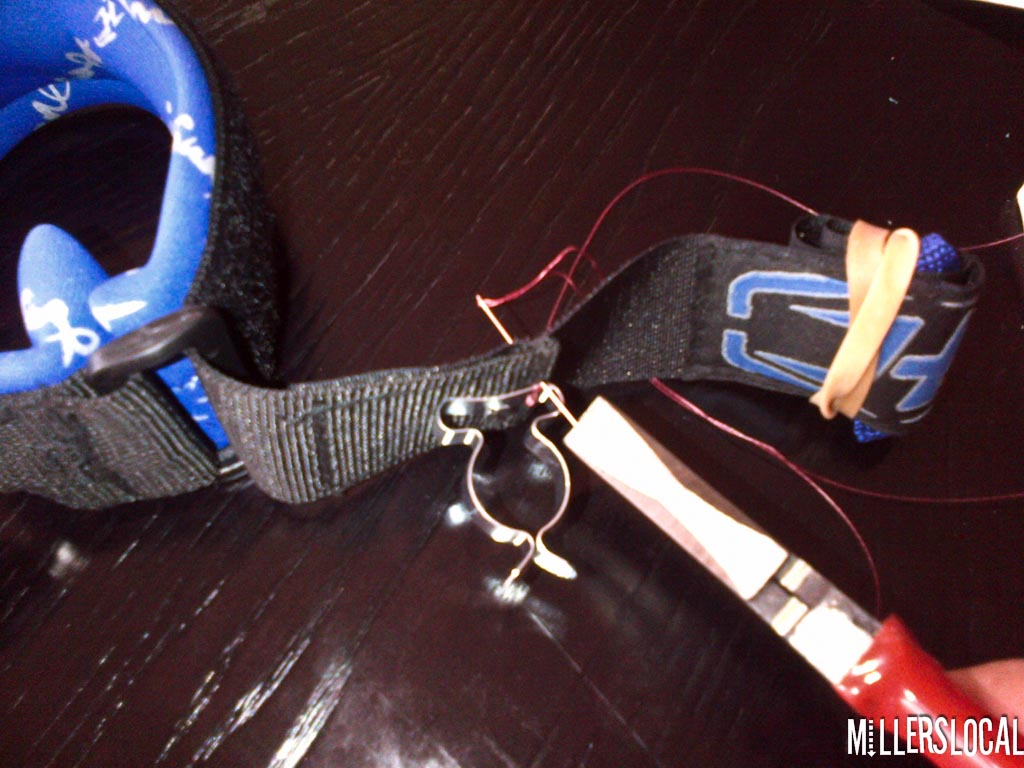
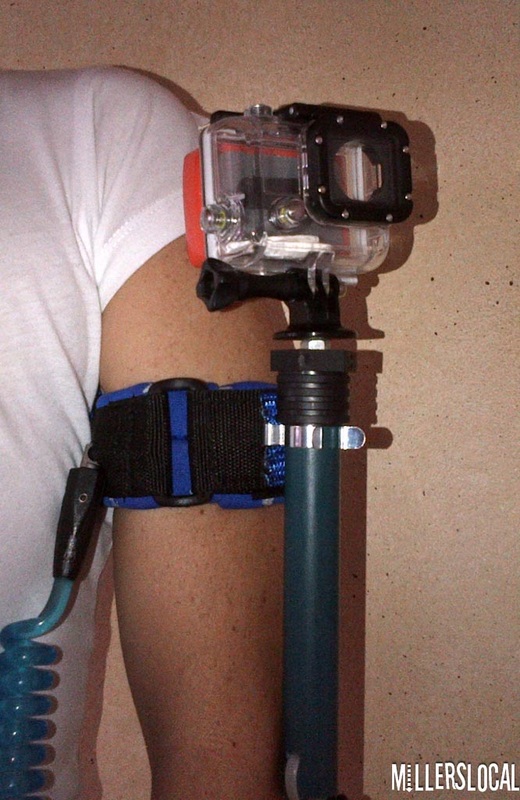
So hopefully by the end of the process you'll have something that looks like this, and have not burnt a hole in the table of stuck a needle through your finger.
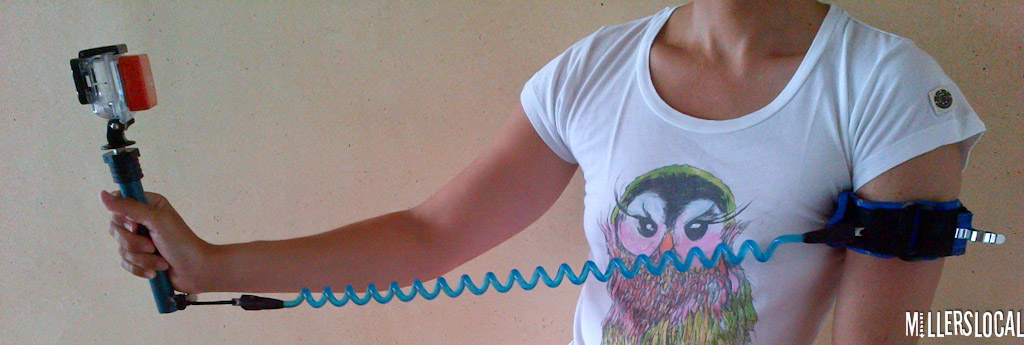
Absolutely no idea how well this thing will work or not - still needs a test drive. Am already thinking about shortening the handle a lil more. Will also add a security string which attaches GoPro housing to the pole - just in case the tripod mount comes loose. Then reckon it would be safe to use with a normal backdoor not the red floaty.
The LangArm Gopro extender pole (which you can get at Cape Union Mart or the OUtdoor Warehouse on William Moffet) also snaps snugly into the 19mm terry clip so could probably use that too, instead of the homemade pole. Cos then you won't need the GoPro tripod mount as the LangArm comes with one built on. Stay tuned for Part two.....will it work!? Comments are closed.
|
 AuthorMillerslocal Archives
July 2021
|

 RSS Feed
